DESK PROCESS FOR PREPARATION OF SM SELL OUT DSR – FINANCE
Input Data Matrix
The list below provides details of input required To Prepare SM SO DSR For Claims Submission:
| SL No | Required Inputs | Received From | Date | Purpose |
|---|---|---|---|---|
| 1 | SM ST Claims DSR | Prepared by Wyzmindz | After Closing SM claims ST DSR | To Check ST transactions moved to SO |
| 2 | SM SO Daily DSR | India SMB Ops | smbops@lenovo.com | On 9th day of every month for the previous months of the same QTR. (Consider after clearing all the exceptions or manual upload) |
| 3 | SMB Rebate List | KC Dharshan | kdharshan@lenovo.com | After the closure of the previous month. Before 2nd of current month. |
| 4 | Consumer LES & LMB List | Rajesh SN | After the closure of the previous month. Before 2nd of current month. | To map MDM ID for retail partners |
| 5 | LFR & Online SO DSR | Arvind(LFR) | akumar33@lenovo.com | Chitra(Online) |
| 6 | GRP List | Dejo | dmathew@lenovo.com Kalpesh | kchande@lenovo.com |
| 7 | Issue Tracker | Wyzmindz(Internal Tracker) | 9th of every month | To check if all the issues received from Sales or Ops team are addressed and resolved. |
SM SO DSR Preparation & Validation:
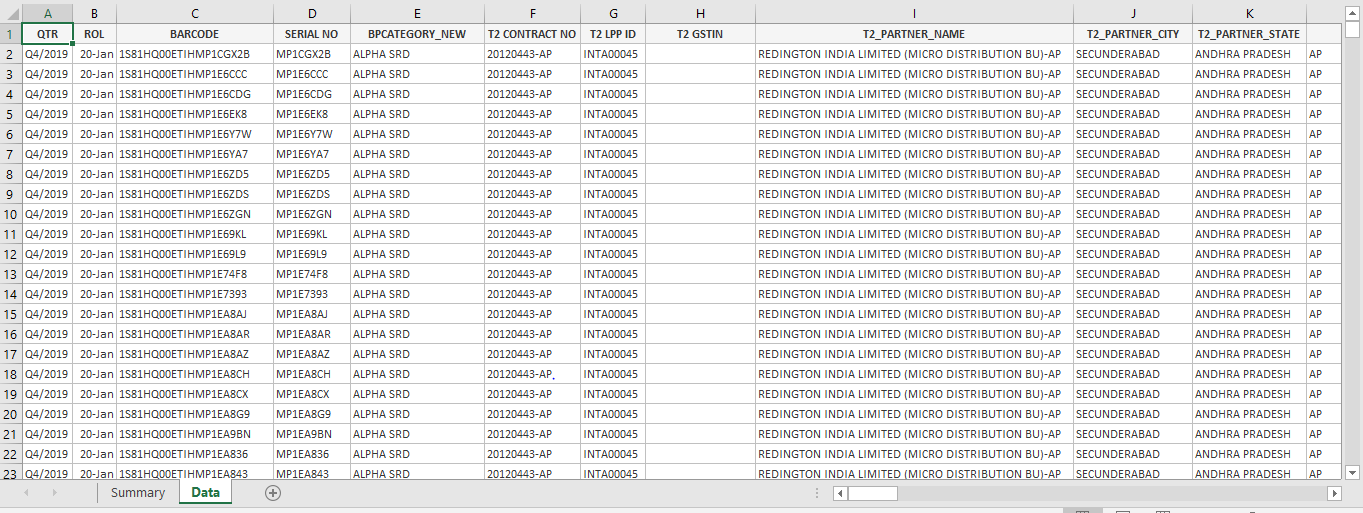
Step 1: Consider “Daily SM Sell Out DSR” published on 8th of current month for the previous month. Below is the Snap Shot
Step 2: Delete “Summary” Sheet.
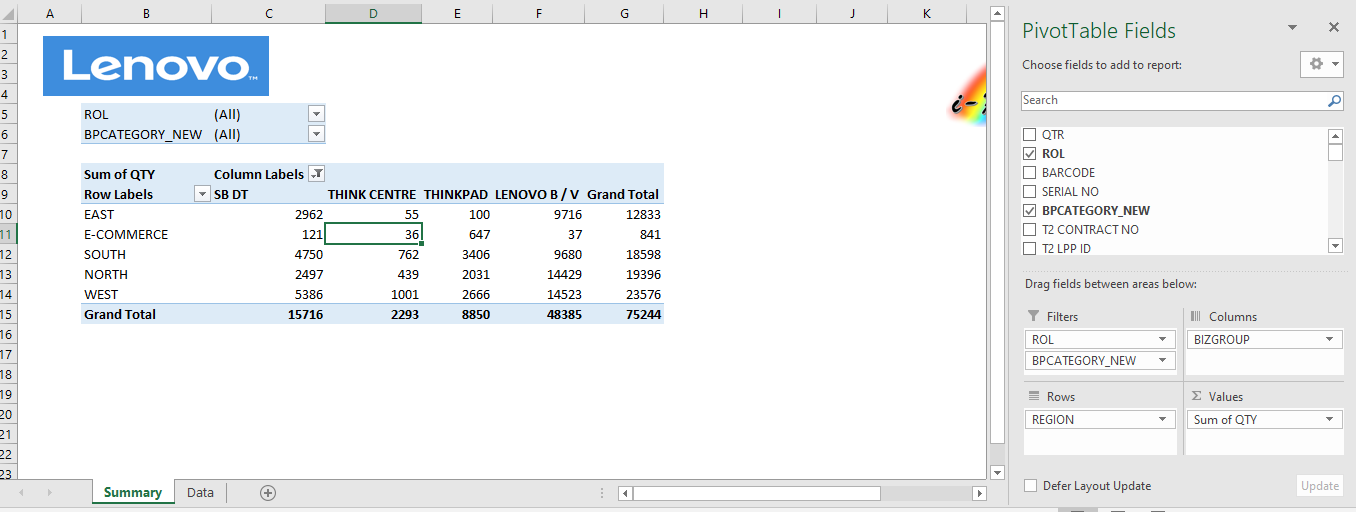
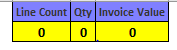
Step 3: Validate No of Line Items, Qty & Inv Value using DM Vs QV Output
a. Select Qtr as “Q4/2019” & SUB_SEGMENT as “SMB” in DM Comparison & QV Comparison
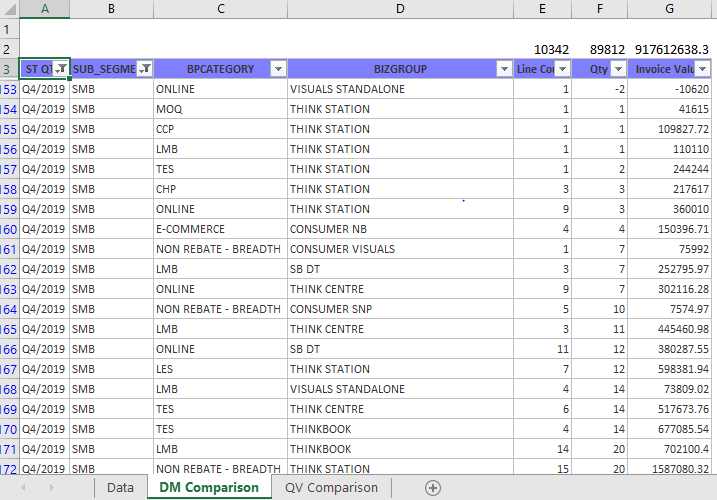
DM Out Put:
QV Output:
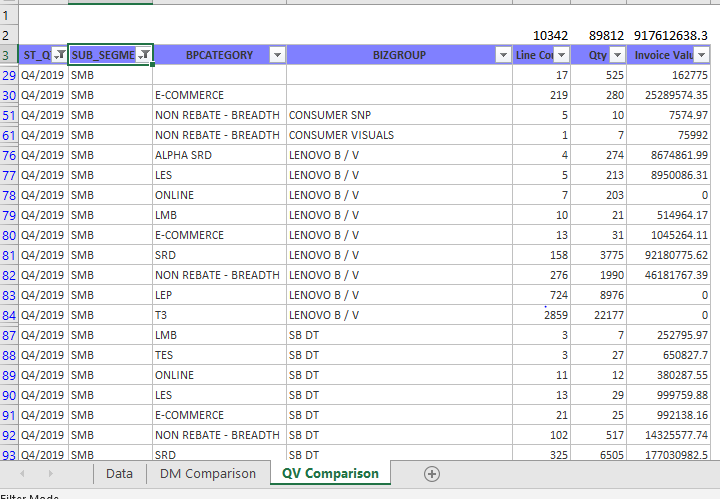
b. After selecting data as explained in step a we should get the out put as below snap shot all the values should be “0”
Step 4: Validate ST to SO transactions & rearrange colounm of ST transactions moved to SO.
- Concatenate “Invoice No, MTM & Qty” from both ST & SO DSR & validate numbers using Vlookup functions
- Move all the details realated to T2 to T3(ex. T2 Partner Name, City, State Territory, Tier & Region) T2 Partner in ST DSR will become T3 partner in SO DSR
- Map the Disty name from ST DSR to SO DSR as T2 Name(T1 partner or Disty in ST DSR will become T2 partner in SO DSR)
- Map the T2 BP category from ST DSR to SO DSR as T3 BP category.
- Map T2 LPP/MDM Codes from ST DSR to SO DSR as T3 LPP/MDM Code(Do not make any changes in LPP/MDM code moved from ST DSR to SO DSR)
Step 5: Rearrange the headers as per Claims Format.
Note
Few New columns needs to be included in SM SO Claims DSR(Managed, T3_Territory, T3_Region, GTN Invoice Date, GTN Revenue, INR/USD, Dummy 2, Dummy 3, bp acquisition status and columns related to MDM ID) Refer attached excel file for header format & Sequence.
📊 SOSB SRD SO DSR Claims Header Format(Excel)
Step 6: Under Header “InvDt” select the date for the months for which Claims DSR is getting prepared .
Note
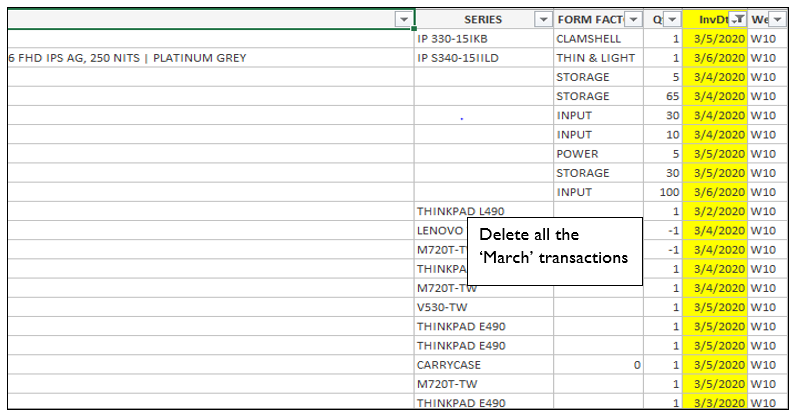
(eg. For preparing the claims submission for the month of Feb’20 the date has to be >or= 1st Jan’20 & <or= 29th Feb’20). Remaining transactions has to be deleted form the DSR.
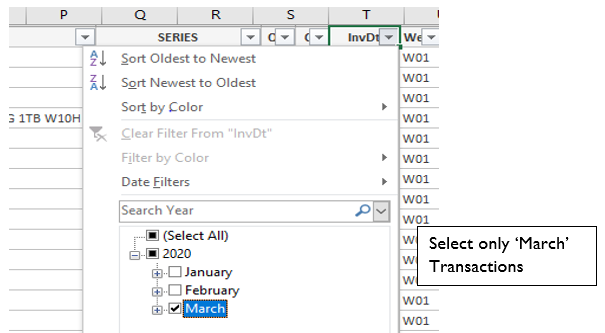
a. For eg. Select March’1920 transactions. And delete all the march transactions in the DSR.
Process For Data Consolidation:
The core data is added with mutiple other data for claims purpose only.
Step 1: Check all the transactions related to SM SO from LFR SO DSR received from Arvind(akumar33@lenovo.com)
Note
Consolidate based on the header against claims DSR, T3 details will not be available in the LFR SO leave it blank in SM SO DSR as well.
T2 MDM ID will be same as per consumer segment
Step 2: Check all the transactions related to SM SO from Online SO DSR received from Chitra(cojha@lenovo.com).
Note
Consolidate based on the header against claims DSR, T3 details & Invoice No will not be available in the Online SO leave it blank in SM SO DSR as well.
T2 MDM ID should be aligned based on SM segment only.
SM SO Claims DSR Preparation:
The DSR prepared for claims submission is same as the format that is required for the upload on DCSDM.
Step 1: Consider SM SO DSR which has been consolidated as per previously explained steps.
Step 2: Following are the mapping done for the New Columns that are manually included for claims DSR Preperation.
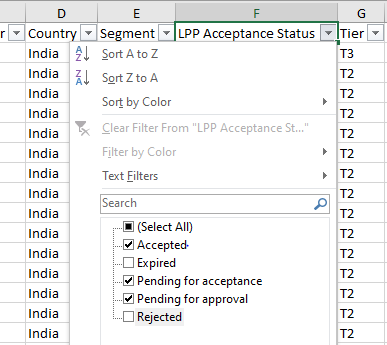
a. Under “Managed” map it as “Yes or No” based on the following considerations.
- Managed will be mapped as “Yes” or “No” based on the Rebate List.
- If Partner status in the T2 Rebate List is mentiones as “Accepted, Pending for acceptance, or Pending for approval” map the partners as “Yes”.
- For all other partners map as “No”.
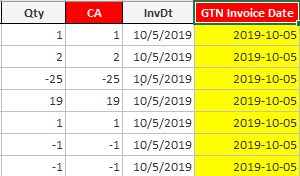
b. Under header “GTN Invoice Date” we need to replicate the data from the header “Invoice Date” and the date format has to be changed manually to “YYYY-MM-DD”.(Eg. 2020-03-06 for 6th March 2020).
c. Under Header “INR/USD” update as “INR” as default for all India ST transactions & USD for all the SLBD transactions.
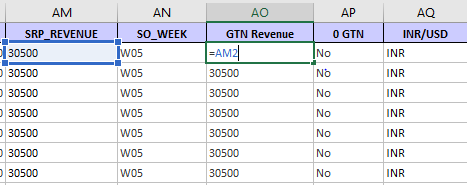
d. Under Header “GTN Revenue” values should be updated from “SRP_Revenue”.
- If SRP value are available for the transactions then “GTN Revenue=SRP_Revenue”(SRP is mandatory for all the Base Machines & Visual Standalone if not pls check with finance team)
e. Map it from City master under header “T3_Territory & T3_Region.
f. Leave it blank under header “Dummy 2”, “Dummy 2” & “bp acquisition status” g. Follow the below table to update the Values under “T1_BP_Type, T1_BP_Sub_Type, T1_D365 & T2_BP_Type, T2_BP_Sub_Type, T2_D365)
| New BP Category | T2_BP_Type | T2_BP_Sub_Type | T2_D365 |
|---|---|---|---|
| T1/ND/Distibutror | T1 Distributor | ||
| LES | T2 Retailer | Storefront | AP Lenovo Exclusive Store |
| SRD | T2 Reseller | Regional_Distributor | |
| LEP | T2 Reseller | T3_Reseller | AP Lenovo Exclusive Partners |
| LMB | T2 Retailer | Storefront | AP Large Multi Brand |
| LFR | T2 Retailer | Storefront | AP Large Format Retailer |
| NON REBATE - BREADTH | |||
| E-COMMERCE | T2 Retailer | etailer | AP eCommerce |
| ONLINE | T2 Reseller | AP eCommerce | |
| S&P SRD | T2 Reseller | Regional_Distributor | AP S&P Partners |
| SMO - SB | T2 Reseller | ||
| TES | T2 Retailer | Storefront | AP Think Experience Store |
Step 3: Align the T2 MDM ID for each T1(Moved from ST & T2 partner as per the SM rebate list received from “KC Sharshan - kdharshan@lenovo.com” on a monthly basis for previous month closure & LES/LMB list received from Rajesh SN.
Attached the file of SB T1 & Alpha SRD LPP Code file.
- ND MDM IDs will be aligned for the transactions moved from ST
Step 4: : Consider the SMB Rebate file received from “KC Sharshan - kdharshan@lenovo.com” & LES & LMB list received from Rajesh SN to map the T3 MDM ID in “SM ST DSR”
Attached the file of SMB Rebate List & LPP master.
a. As we have already mapped LPP Codes for all the transactions moved from ST. Map only LEP MDM IDs for all other SO transactions
b. LEP MDM IDs will be mapped based on T3 Partner Name & T3 Partner state & T3 Partner GSTIN/PAN if T3 state is not available consider T2 state as T3 state.
Validation Process
| SL No | Headers as displayed in Claims DSR(In Same Sequence) | Logic/Data Mapping - Description for populating respective headers | Mandatory Field Format as defined by AP | Validation Points |
|---|---|---|---|---|
| 1 | QTR | Quarter format has to be in "YYYY-Q#" | YYYY-Q# | No Blanks |
| 2 | ROL | as per QV extract | NA | No Blanks |
| 3 | BARCODE | As per CDMS | Length of Barcode has to be 20 | Blanks can be there for transactions that is flowing from ST DSR |
| 4 | SERIAL NO | As per CDMS | Length of serial # has to be 8 | Blanks can be there for transactions that is flowing from ST DSR |
| 5 | BPCATEGORY_NEW | 1. For ST=SO Transactions consider under T1 2. For rest based as per system generated | No | No Blanks |
| 6 | T2 CONTRACT NO | 1. As per CDMS 2. For ST=SO Transactions T1 Sold to Code from ST DSR | No | No Blanks |
| 7 | T2 LPP Code | 1. For Rebated Partners – LPP/MDM IDs has to be based on Rebate List 2. for retail Transactions LPP/MDM IDs has to be mapped based on LES/LMB list received | LPP/MDM ID Code as per defined LPP Code format | 1. No Blanks 2. LPP/MDM Codes should be based on Vertical 3. Partner Name,vertical & Contract # has to match with Rebate list based for all the LPP/MDM code aligned in DSR |
| 8 | T2_PARTNER_NAME | 1. For CDMS Transactions - Name is as per CDMS Data 2. For ST=SO Transactions : T2 Name should be Disty name from ST DSR, this is manually done for claims DSR. | No | No Blanks |
| 9 | T2_PARTNER_CITY | 1. For CDMS Transactions - Name is as per CDMS Data 2. For ST=SO Transactions : T2 City from ST DSR | no | No Blanks |
| 10 | T2_PARTNER_STATE | Mapping is based on SMB Segment City Mapping file | Based on GTN Format | 1. No Blanks 2. Quarterly Confirmation on State vs Territory vs Region Mapping file |
| 11 | TERRITORY | Mapping is based on SMB Segment City Mapping file | Based on GTN Format | 1. No Blanks 2. Quarterly Confirmation on State vs Territory vs Region Mapping file |
| 12 | REGION | Mapping is based on SMB Segment City Mapping file | Based on GTN Format | 1. No Blanks 2. Quarterly Confirmation on State vs Territory vs Region Mapping file |
| 13 | Managed | For rebated partners tag under "Yes" else "No" | "Yes"/"No" | No Blanks |
| 14 | T3_BPCATEGORY | 1. For CDMS Transactions category will be T3/LEP based on rebate list 2. For ST=SO, category is based on ST DSR | No Blanks | |
| 15 | T3_Contaract_No | Contract # based on rebate list for rebated partners else blank | Blanks can be there | |
| 16 | T3 LPP Code | 1. Based on rebate List for rebated partners 2. Refer to any special Instructions received | As per LPP/MDM ID format | 1. LPP code aligned has to match agianst T3 Name, GSTIN Contract # and Category 3. LEP Tagging has to be only for LEP rebated partners else T3 as default(for SO transactions) |
| 17 | GST # | As per Disty reporting | No | NO |
| 18 | T3_CUSTOMER_NAME | As per Disty reporting | No Special character like "/' | NO |
| 19 | T3_LOCATION | As per Disty reporting | No | No Blanks |
| 20 | T3_STATE | Mapping is based on SB Segment City Mapping file 2. If T3 City is blank/Select, consider T2 State = T3 State | Based on GTN Format | 1. No Blanks 2. Quarterly Confirmation on State vs Territory vs Region Mapping file |
| 21 | T3_Territory | Mapping is based on SB Segment City Mapping file 2. If T3 City is blank/Select, consider T2 Territory = T3 Territory | Based on GTN Format | 1. No Blanks 2. Quarterly Confirmation on State vs Territory vs Region Mapping file |
| 22 | T3_Region | Mapping is based on SB Segment City Mapping file 2. If T3 City is blank/Select, consider T2 Region = T3 Region | Based on GTN Format | 1. No Blanks 2. Quarterly Confirmation on State vs Territory vs Region Mapping file |
| 23 | TOWN_TIER | As per City Mapping file | No | Blanks can be there |
| 24 | MTM | As per Disty reporting | No | NO |
| 25 | BIZGROUP | Based on MTM Master | No | No Blanks |
| 26 | CATEGORY | Based on MTM Master | No | No Blanks |
| 27 | PRODUCT_TYPE | Based on MTM Master | No | No Blanks |
| 28 | FAMILY | Based on MTM Master | No | Blanks can be there |
| 29 | OSDOS | Based on MTM Master | No | Blanks can be there |
| 30 | PROCESSOR_TYPE | Based on MTM Master | No | Blanks can be there |
| 31 | SPECIFICATION | Based on MTM Master | No | No Blanks |
| 32 | SERIES | Based on MTM Master | No | Blanks can be there |
| 33 | QTY | 1. As per Disty shared | No transactions with value "0" | No Blanks |
| 34 | CA | 1. For all transactions where Biz Group is product then Qty = CA 2. for S&P, Services & Visuals CA = 0 default | No | 1. values has to be >/< 0 for DT/NB 2. 0 for S&P line items |
| 35 | SCANNED_TIME | As per CDMS Data | as per QV extract | Blanks can be there for ST=SO Transactions |
| 36 | INVOICE_DATE | As per partner reporting | as per QV extract | No Blanks |
| 37 | GTN Invoice Date | Invoice Date = GTN Invoice Date | "yyyy-mm-dd" | 1. No Blanks 2. Invoice Date should belong to date range during running quarter 3. At Transactions level comparision between Invoice Date & GTN Date has to be "True" |
| 38 | SRP_REVENUE | SRP*qty | No | No Blanks |
| 39 | SO_WEEK | As per ROL calendar mapping | No | No Nlanks |
| 40 | GTN Revenue | 1. SRP Revenue = GTN Revenue for DT/NB & Hard bundle S&P 2. For Stand Alone Invoice Value = GTN Revenue | No | 1. No Blanks 2. If 0 then it has to be hard bundle S&P line items |
| 41 | 0 GTN | Default tagging under "No" unless specific list of MTM received | Yes/No | No Blanks |
| 42 | INR/USD | Default INR | INR/USD | No Blanks |
| 43 | INVOICE_NO | As per partner reporting | No | No Blanks |
| 44 | SEGMENT | Default SM | SM | No Blanks or different Segment |
| 45 | MTMSegment | No Mapping is done as of now unless available | No | Blanks can be there |
| 46 | ASQ | As per QV generated | No | Blanks can be there |
| 47 | Dummy 2 | Not Required | No | Blanks can be there |
| 48 | Dummy 3 | Not Required | No | Blanks can be there |
| 49 | bp acquisition status | No Mapping is done as of now | No | Blanks can be there |
| 50 | T2_MDM_ID | 1. For Rebated Partners – LPP/MDM Code has to be based on Rebate List and as per any speacial instruction received if any | ||
| 2. For Retail Transactions LPP/MDM Code has to be as per SM Segment | ||||
| 3. For Non Rebated Breadth if LPP/MDM code is not available : LPP Code will be = to Cust Code | ||||
| 4. For all partners to whom LPP/MDM code is aligned do not change or remove unless requested or approved by segments ops LPP/MDM Code as per defined LPP/MDM Codes 1. No Blanks | ||||
| 2. LPP/MDM Codes should be related to SM Segment | ||||
| 3. LPP/MDM Codes should be based on Vertical | ||||
| 4. Partner Name,vertical & Contract # has to match with Rebate list based for all the LPP/MDM code aligned in DSR | ||||
| 51 | T2_BP_Type | Refer Table 2 on page 11 | Yes | Blanks Can be there |
| 52 | T2_BP_Sub_Type | Refer Table 2 on page 11 | Yes | Blanks Can be there |
| 53 | T2_D365 | Refer Table 2 on page 11 | Yes | Blanks Can be there |
| 54 | T3_MDM_ID | 1. Based on rebate List for rebated partners | ||
| 2. Refer to any special Instructions received | ||||
| As per LPP/MDM ID format 1. LPP code aligned has to match agianst T3 Name, GSTIN Contract # and Category | ||||
| 3. LEP Tagging has to be only for LEP rebated partners else T3 as default(for SO transactions) | ||||
| 2. Transactions moved from ST will be based on ST BP Cat no changes to be made in SO Catgory | ||||
| 55 | T3_BP_Type | Refer Table 2 on page 11 | Yes | Blanks Can be there |
| 56 | T3_BP_Sub_Type | Refer Table 2 on page 11 | Yes | Blanks Can be there |
| 57 | T3_D365 | Refer Table 2 on page 11 | Yes | Blanks Can be there |
Process For Approval & Upload:
Once the DSRs are prepared for Claims submission, the DSR is validated at WyzMindz end and shared with the Lenovo Ops Heads for Approval.
The approval mail is shared in the below format.
After the approval from Ops Head is shared, the DSR is validated for one last round for standard columns like “Qtr”, “Qty”, “CA”, “GTN Invoice Date” & “GTN Revenue” along with the changes suggsted by Ops head before uploading the DSR onto DCSDM.
Below is the procedure for uploading the approved DSR onto DCSDM.
Step 1: Logon to DCSDM using the link (http://cdms.lenovo.com:8083/DCSDM/)
Step 2: Login with the user credentials.
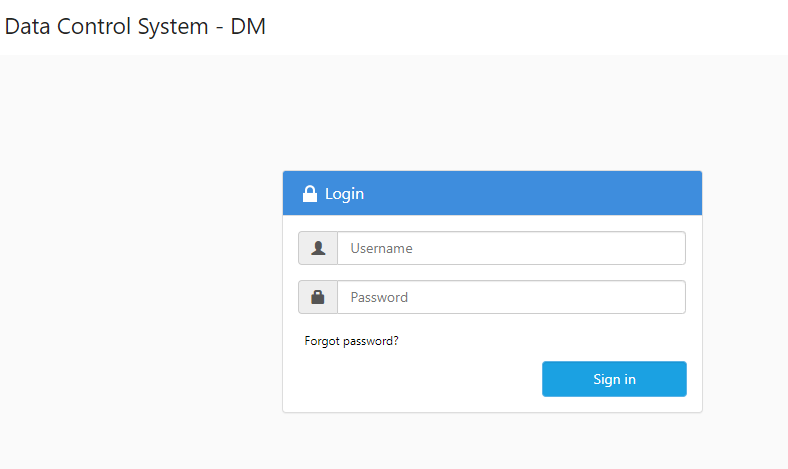
Step 3: After login in using the user credentials. Below page will be displayed.
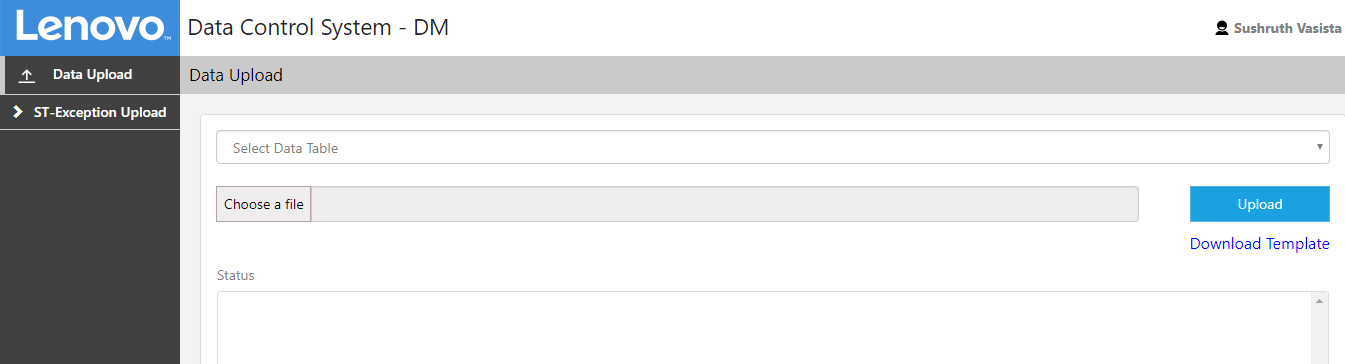
Step 4: From the Drop down, please select the table onto which the DSR needs to be uploaded. For this case we need to select “MONTHLY INDIA SB SRD SO DSR CLAIMS”.

Step 5: Please choose the file from the destination where the DSR is saved.
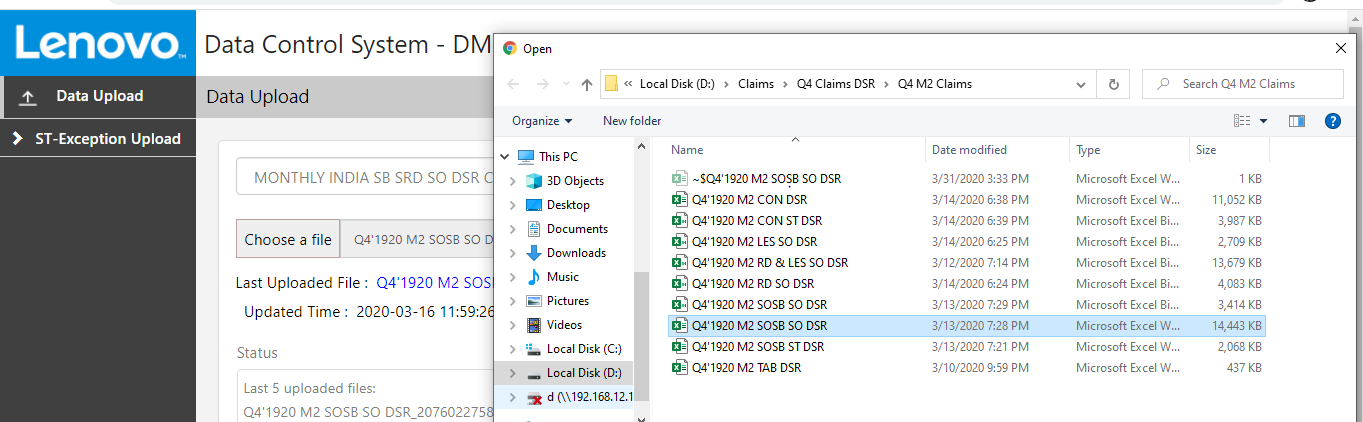
Step 6: Please select the file that needs to be uploaded and click on open at the bottom right of the dialogue box.
